Setting up a home theater in your Stamford, CT home transforms how you experience movies, sports, and streaming shows. Whether you’re planning a modest two-speaker setup in a bedroom or a full 7.1 surround system in your basement, home theater installation requires thoughtful planning around your space, budget, and technical comfort level. This guide walks you through the decisions you’ll face, from assessing your room and choosing equipment to deciding whether to DIY or hire a professional. By the end, you’ll have a clear roadmap for getting movie-theater sound and picture quality right in your own home.
Table of Contents
ToggleKey Takeaways
- Successful home theater installation in Stamford, CT starts with measuring your room and avoiding square layouts that create bass problems—a 12×15 ft space with 8-ft ceilings is ideal for dedicated basements.
- Essential equipment includes a display (TV or projector), audio receiver ($200–$600), speakers ($150–$800+), media source, and quality cables; a subwoofer is nearly essential for convincing bass response.
- DIY installation works for basic setups, but complex projects involving wiring through walls, acoustic treatment, or motorized screens warrant hiring a professional installer to avoid costly mistakes.
- Use CL2/CL3 certified in-wall rated cable for wall runs, 14-12 AWG speaker cable under 50 feet, and HDMI 2.1 for 4K sources—proper wiring prevents hum and phase issues.
- Subwoofer placement dramatically affects sound quality; test placement in multiple spots before finalizing, as corner positioning often creates uneven bass response.
- When hiring a Stamford, CT home theater professional, prioritize certified installers with references who offer calibration, warranties, and local code knowledge over the lowest price quote.
Planning Your Home Theater Space in Stamford
Assessing Your Room and Layout
The foundation of any good home theater is the room itself. Start by measuring your space in feet, length, width, and ceiling height. A room that’s 12 feet wide by 15 feet deep with 8-foot ceilings is a common basement size and works well for a dedicated theater. Avoid rooms that are perfectly square: they create standing wave issues where bass frequencies amplify or cancel out in certain spots, making some seats sound great and others hollow.
Next, walk the perimeter and note where walls are solid (load-bearing studs and drywall) versus where pipes, ducts, or wiring run behind them. This matters because you’ll need to route speaker cables and possibly add acoustic treatment. Check for windows or glass doors, these reflect sound and light, so you’ll want blackout solutions. Are there HVAC vents, water heaters, or furnaces nearby? Mechanical noise bleeds into theaters fast.
Consider the practical path from your media source (TV, projector, streaming device) to seating and back to speakers. Will you run wires along the baseboards, through the ceiling, or through walls? Running cables through walls requires drilling carefully, you don’t want to nick electrical wiring or plumbing. In Stamford, if you’re adding new outlets or modifying the electrical layout for dedicated theater circuits, you’ll likely need a permit and a licensed electrician to sign off. Building codes vary, but permanent installations generally fall under the National Electrical Code (NEC).
Essential Equipment You’ll Need
A functional home theater needs five core pieces: a display, an audio receiver, speakers, a media source, and cables. Let’s break down each.
Display: Your choice is a TV or a projector. TVs are easier to set up, work with ambient light, and cost less upfront (think $500–$2,000 for a solid 4K set). Projectors deliver that true cinematic experience but require a dark room, a proper screen, and regular maintenance (bulb replacement every 2,000–5,000 hours). A 100-inch projector screen for your Stamford home might run $300–$1,500 depending on quality.
Audio Receiver: This is your control hub, it amplifies speaker signals and switches between sources. A decent AVR (audio-video receiver) with Dolby Atmos support and at least 100 watts per channel costs $200–$600. Budget brands like Denon or Yamaha are reliable for DIY setups.
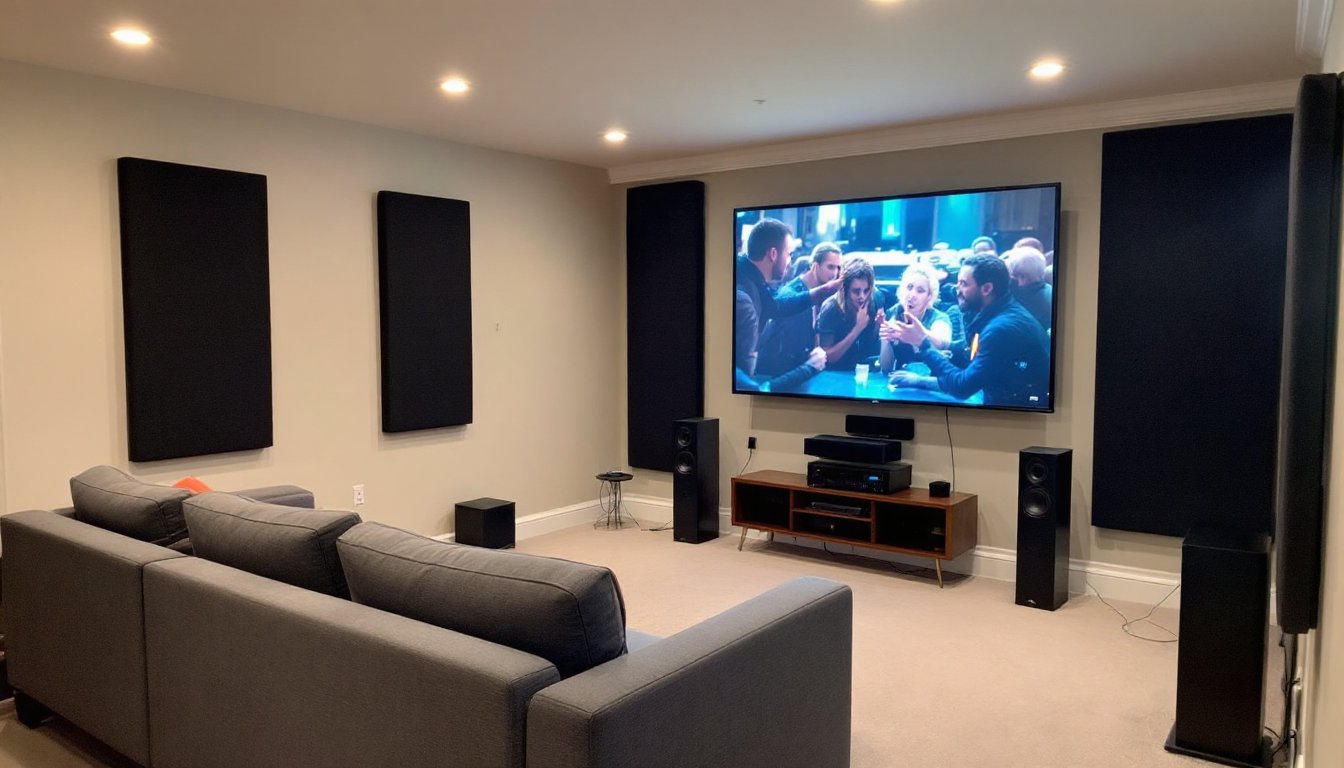
Speakers: Start with a left-center-right (L/C/R) front soundstage and add surround speakers as budget allows. A basic bookshelf speaker pair runs $150–$400: center channels add $100–$200. Surround speakers come later. A subwoofer ($200–$800) adds punch to bass and is nearly essential for home theater.
Media Source: A streaming device like an Apple TV, Roku, or dedicated Blu-ray player ($50–$150).
Cables: Don’t cheap out here. HDMI cables rated for high-speed (especially for 4K or Atmos), speaker cables with proper gauge, and balanced XLR or RCA connections matter. Figure $50–$150 for quality cabling. Research shows that using home renovation cost guides can help you budget for the entire project, from equipment to installation labor if needed.
DIY Installation vs. Professional Services
Deciding whether to install yourself or hire a pro depends on your comfort with electronics, tools, and problem-solving. Most basic setups, placing a TV, mounting a soundbar, running cables across the room, are DIY-friendly. You need a drill, a level, a stud finder, and patience to route cables neatly.
But here’s the honest truth: if your room needs acoustic panels, your walls need in-wall wiring, or you’re integrating a projector with a motorized screen and multiple zones, hire someone. Mistakes in wiring can create hum, phase issues, or dead spots in surround sound. Acoustic panels installed poorly waste money. In Stamford, professionals bring knowledge of local codes, access to better pricing on materials, and warranties on labor.
For basic projects, you’re looking at a weekend of work. For complex setups with custom mounting, acoustic treatment, and integrated automation, expect 2–4 days and $1,500–$5,000+ in labor. Get quotes from local installers: many offer free consultations. Platforms like HomeAdvisor let you compare costs and read reviews from other Stamford homeowners who’ve done similar projects.
Wiring and Audio Setup
Wiring is where DIYers often stumble. Here’s a practical approach:
Speaker Cable Routing: Use 14 AWG or 12 AWG twisted speaker cable for runs under 50 feet. For longer runs (say, from a distant receiver to rear surrounds), step up to 10 AWG. Twist pairs together to reduce interference. If you’re running cable through walls, use in-wall rated (CL2 or CL3 certified) cable, it’s fire-rated and code-compliant. Fish tape and a drill with a long bit help pull cable through studs. Mark where you drill so future renovators don’t accidentally cut into hidden wires.
HDMI and Audio Connections: Use HDMI 2.1 cables for 4K/Atmos sources. Run separate balanced audio cables (XLR or RCA) from your media source to the receiver’s inputs. Don’t rely on HDMI audio alone if you can help it: dedicated audio cables are cleaner and more flexible.
Subwoofer Placement: This is crucial. A sub in the corner of the room reinforces bass, but it often creates boomy, uneven response. Experiment: place it in three or four spots and listen to low-frequency scenes (explosions, engines). Move it where bass sounds full and even, not localized to one wall. It’s tedious, but it transforms your sound.
Cable Management: Use raceways or conduit along baseboards to keep cables organized and protected from foot traffic and pets. Label everything with a label maker: future you will thank present you when you need to swap a speaker.
Finding Local Installation Help in Stamford
If you’re leaning toward hiring a pro, Stamford has options. Start by searching for home theater installers with certifications (THX, CEDIA, or direct manufacturer certifications). Ask about their experience with your room size and equipment type. A good installer should ask you questions, about your budget, the room’s acoustics, and your family’s viewing habits, not just sell you their favorite brand.
Check references and ask about warranties. Do they guarantee sound field measurements after setup? Will they walk you through how to use your system? These matter more than a low price quote. Professionals in the Stamford, CT area can help you navigate permit requirements if needed, especially for permanent installations that tie into your home’s electrical panel.
When comparing estimates, don’t just look at labor cost. Ask what’s included: equipment delivery, removal of old gear, full calibration, and follow-up support? A $2,000 install from someone with a warranty and good reviews often beats a $1,500 fly-by-night outfit. The top-rated stereo and home theater system professionals in Stamford, CT can be found through local review sites, where past clients share their experiences.
Conclusion
Building a home theater in Stamford doesn’t require years of experience or a massive budget. Honest assessment of your room, realistic equipment choices, and clean wiring practices get you 90% of the way there. Whether you go solo or hire help, invest time in planning. A well-thought-out setup pays dividends in picture quality, sound, and reliability for years to come.