Building a home theater in Dallas presents unique opportunities, and challenges. The city’s heat and humidity demand careful material selection, proper ventilation, and humidity control. Whether you’re converting a spare bedroom, finishing a basement, or repurposing a media room, a well-planned home theater combines acoustic engineering, lighting discipline, and equipment selection into an immersive space that feels professional without requiring contractor-level expertise. This guide walks you through the essentials: room planning, gear selection, sound optimization, and the finishing touches that transform a room into a retreat. Think of it as a project you can tackle yourself, with realistic checkpoints along the way.
Table of Contents
ToggleKey Takeaways
- A home theater Dallas project requires managing the city’s heat, humidity, and light conditions through proper ventilation, dehumidification (40–60% relative humidity), and blackout window treatments.
- Room dimensions and layout directly impact sound quality; choose rectangular spaces with at least 12 feet of depth and avoid perfect cubes that trap bass frequencies.
- Invest in a quality subwoofer and surround receiver as your foundation—a $1,200 mid-range receiver with decent speakers and a good sub outperforms expensive equipment with cheap speakers.
- Acoustic treatment with corner bass traps and wall-mounted panels ($500–$1,500 total) is often overlooked but transforms sound quality more than equipment upgrades alone.
- Layer blackout shades with dark wall paint, dimmable LED strips, and proper theater seating to create comfort and control; dedicated media chairs ($400–$2,000) are more important than couches for viewing experience.
- Use receiver-included calibration microphones and measurement tools to auto-tune your space, then add bass shaker transducers as a neighbor-friendly solution for feeling low frequencies without volume increases.
Understanding Home Theater Basics for Dallas Homes
A home theater isn’t just a TV and speakers in a dark room, it’s a coordinated system where room design, equipment, and calibration work together. The fundamentals start with isolation: decoupling the theater space from outside noise, vibration, and light leaks. Dallas homeowners should account for A/C noise, street traffic, and the afternoon sun coming through west-facing windows.
The core principle is this: you control what enters and exits the room. Sound travels through walls, floors, and ceilings: light bounces off untreated surfaces and washes out contrast. Before buying a single speaker, plan how you’ll manage both. This often means adding acoustic panels, light-blocking window treatments, and ensuring HVAC runs quietly (or installing a separate, quieter system for the room).
Dallas-specific note: temperature and humidity swings are real. Electronics perform best at 40–60% relative humidity. In summer, A/C naturally dehumidifies: in off-season or mild winters, a small dehumidifier ($100–$300) prevents condensation on equipment. This step saves repair headaches down the line.
Choosing the Right Room Layout and Dimensions
Room dimensions matter more than most DIYers realize. Acoustic problems multiply in rooms with dimensions that share common ratios (e.g., a 12′ × 12′ × 8′ room tends to trap bass at certain frequencies). Ideal home theater spaces are rectangular and avoid perfect cubes. If you’re working with an existing room, you’ll optimize what you have, but knowing the issues helps you address them.
Measure your space first: length, width, and ceiling height. A typical home theater needs at least 12 feet of depth for comfortable seating placement, closer, and the viewing angle becomes steep: farther, and a projector image grows hard to fill the screen. Seating distance from screen should be 1.5 to 2.5 times the screen’s diagonal width. A 100-inch screen means sit 12–20 feet back. This direct calculation guides both room selection and equipment scaling.
For Dallas homes, consider room location: basement theaters stay cooler (saving A/C energy) but may have moisture issues: upstairs bonus rooms need blackout solutions for that Texas sun. A spare bedroom works if you can control light and manage sound bleed to adjacent spaces. Measure, document, and sketch the layout before committing to equipment or construction.
Essential Audio and Video Equipment Selection
Projectors and Screens vs. Modern Television Systems
The projector-versus-TV debate hinges on room size, brightness, and flexibility. Projectors scale easily (100–150 inches) and suit dedicated dark rooms. They demand a dark environment to shine and cost $800–$3,000+ for quality. TVs (65–85 inches) work in multi-use rooms, handle ambient light better, and cost $600–$2,500 for upper-end models. For Dallas homes where natural light control is challenging, a high-brightness TV or a projector with a bright lens ($2,000+) keeps contrast sharp.
Projector setup requires ceiling mounting, a pull-down or fixed screen, and throw distance calculation, the distance from projector to screen. A short-throw projector sits closer to the screen: standard throw needs more depth. Check the projector’s throw ratio specs before buying. Screen choice matters too: white screens reflect all light (higher brightness, narrower viewing angle): gray screens absorb ambient light (better contrast, softer image). Budget $300–$800 for a quality motorized drop-down screen, or $150–$400 for a fixed frame.
For audio, start with a proper surround receiver (Dolby Atmos capable, 100 watts per channel minimum), $400–$800, and a speaker package (front left/center/right, rear surrounds). Five-speaker systems run $800–$2,000: higher budgets support Atmos height speakers ($200–$600 more). Add a subwoofer ($300–$1,500) for bass: this single upgrade transforms impact more than almost anything else. Real-world example: a $1,200 mid-range receiver with a decent speaker set and one quality sub beats a $3,000 receiver with cheap speakers every time.
Optimizing Acoustics and Sound Quality
Acoustics is where most DIYers miss opportunity. A room absorbs, reflects, and amplifies sound unevenly. Hard surfaces (drywall, tile, concrete) bounce sound and create echoes: soft surfaces (carpet, curtains, furniture) dampen it. The goal is balanced absorption, you want some reflection for liveliness, some absorption to kill ringing.
Start with bass traps in room corners: bass frequencies bunch there. Corner absorption panels ($200–$600 for a set) address the biggest offender. Then add wall-mounted acoustic panels behind and beside speakers. A typical setup uses 8–12 panels across the front and sides ($500–$1,500 total). Position the first reflection points (where sound from speakers bounces off walls to listeners’ ears) and treat those walls.
Measurement tools like a phone-based decibel meter or free apps (REW, Audacity) help spot problem frequencies. Many surround receivers include calibration microphones that auto-tune sound for your room, use this feature: it’s often overlooked but highly effective. For Dallas homes with A/C running, add bass shaker transducers ($100–$300) under seats to feel low frequencies without turning up volume, a neighbor-friendly solution in dense areas. These sit under seat cushions and connect to your receiver.
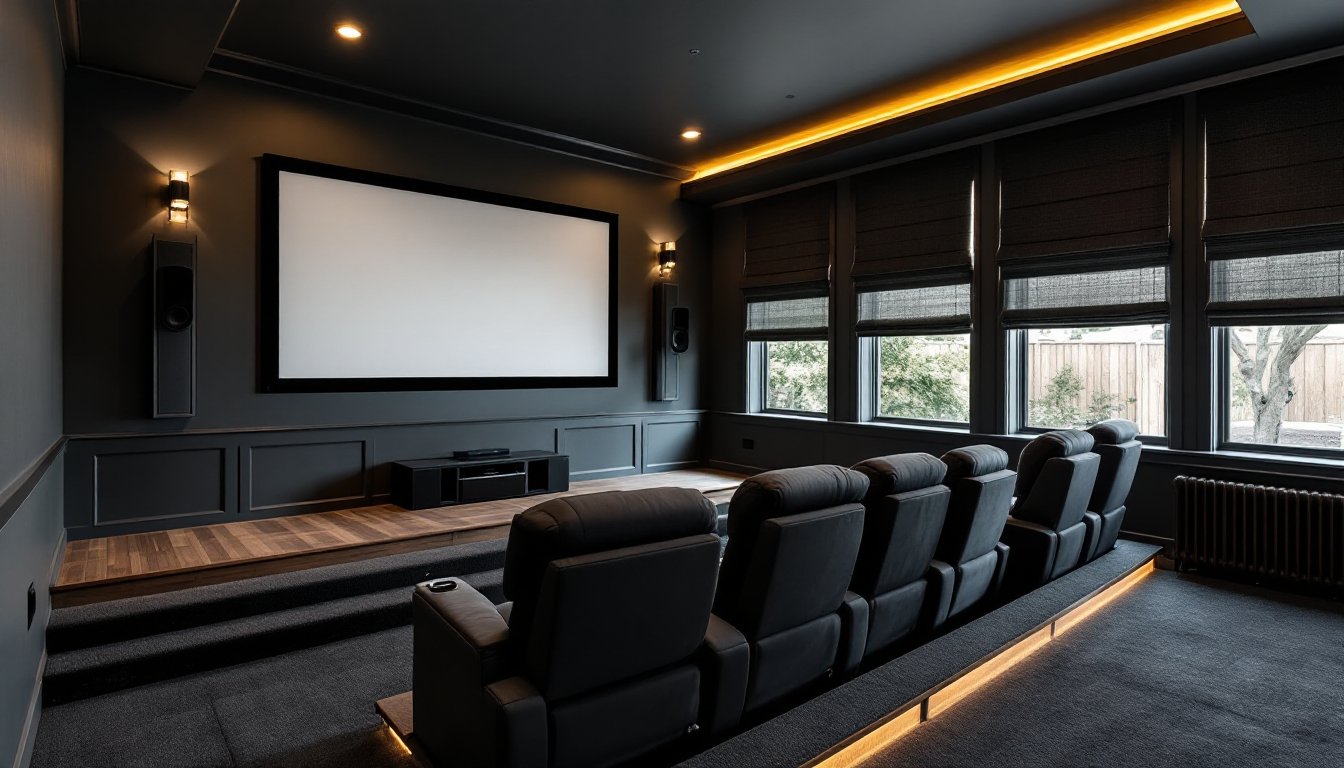
Lighting Control and Design Considerations
Lighting in a home theater serves two jobs: kill ambient light during movies and provide practical light when the room isn’t in use. Total blackout wins during movies. Start with blackout roller shades or cellular shades ($100–$300 per window). They block 99% of light. For fabric, look for opaque backing and sealed edges to prevent light leaks. DIY note: measure from inside the window frame, account for overlap on sides, and install brackets carefully. Drywall anchors hold fine for most shades: if you hit a stud, great.
Add LED strips (warm white, dimmable, $50–$150) along baseboards or hidden ledges for ambient light when the room’s in use. A dimmer switch ($30–$60) controls main overhead lights if kept. Many DIYers pull out ceiling fixtures entirely and rely on LEDs and cove lighting for a cleaner look and less glare on screens. Install strips using adhesive backing or small brackets: wire them to a receiver-compatible dimmer or smart home system if you prefer.
Aboid light reflections on screens. Dark walls (dark gray, dark blue, black) absorb spill light: white or cream walls require heavy blackout treatment. Paint choice ($15–$40 per gallon, 1 gallon covers ~350 sq ft) affects ambiance, darker tones hide seams and wiring, and they feel intentional rather than like a basement dungeon.
Seating and Comfort Solutions for Dallas Homeowners
The best picture and sound mean nothing if you’re uncomfortable. A proper media seating chair or sectional is the single largest DIY investment after equipment. Avoid standard couches: they’re too deep, lack proper back support, and place viewers too far from the screen. Dedicated theater seating (single or sectional recliners) runs $400–$800 per seat for decent quality, up to $2,000+ for motorized, heated leather. Budget-conscious builders hunt Facebook Marketplace or local furniture liquidation stores for used theater seating, surprisingly common as people upgrade.
For DIY construction, a raised platform adds viewing comfort: mount a 16-inch-high riser (plywood frame, 1×12 lumber, supported by 2×4 joists) to elevate the second row above the first. This prevents sight-line obstruction and creates tiered seating. Build the frame on the floor, brace it securely (no movement under foot traffic), and cover with carpet or felt to muffle footsteps. A simpler solution: stadium-style risers (portable, $300–$600 for two rows) work if your room allows repositioning.
Ventilation matters for seating areas: warm bodies and tight rooms increase humidity and temperature. Ensure A/C return vents reach seating, or add a small portable fan ($50–$100) to keep air circulating. In Dallas heat, comfort during summer movie marathons isn’t a luxury, it’s essential. Dress rehearsal in the fully equipped room before finalizing furniture placement saves a week of adjustments.