Setting up a home theater isn’t just about buying the biggest TV and loudest speakers anymore. Dallas homeowners have increasingly diverse options for creating a cinematic experience at home, whether you’re retrofitting an existing bedroom, converting a basement, or building a dedicated media room from scratch. The good news? Home theater installation in Dallas, TX doesn’t require a Hollywood budget or a degree in electrical engineering. With proper planning, the right equipment choices, and realistic expectations about DIY versus professional help, you can build a system that rivals many commercial theaters. This guide walks you through the key decisions, from layout and acoustics to equipment selection and installation logistics specific to the Dallas area.
Table of Contents
ToggleKey Takeaways
- Home theater installation in Dallas, TX requires careful planning around room dimensions, acoustics, and seating distance—your TV size should be 1.5 to 2.5 times the viewing distance away for optimal picture quality.
- Audio systems typically account for 50–70% of the home theater experience, so allocate your budget toward quality speakers and a center channel that handles 60% of dialogue clarity.
- Choose between DIY installation for basic tasks like wiring and TV mounting, or hire professional Dallas contractors ($1,500–$5,000 for labor) when electrical upgrades, structural changes, or permits are needed.
- Use proper 14-gauge or 12-gauge speaker wire for runs over 50 feet, in-wall-rated cables (CL2 or CL3), and invest in HDMI 2.1 cables to avoid sync issues and signal dropouts.
- Calibration with an SPL meter and manual speaker volume checks at your seating position are critical final steps that separate professional-quality home theater systems from poorly optimized setups.
- Finishing touches like blackout curtains, acoustic panels, quality seating, and a power conditioner with surge protection provide both aesthetic appeal and protection against Dallas summer power fluctuations.
Understanding Your Space and Layout Planning
Before you buy a single component, measure your room and understand how it will behave. Home theater performance depends heavily on the physical space, its dimensions, materials, and how sound moves through it.
Assessing Room Dimensions and Acoustics
Start with a tape measure and notebook. Record the length, width, and ceiling height of your room in feet and inches. Small rooms (under 150 square feet) favor compact surround systems and near-field seating: larger basements or bonus rooms let you position seating farther from the screen and speakers.
Room shape matters too. Rectangular rooms with parallel walls can create standing wave issues, frequencies that boom or disappear at certain positions. If your space is an irregular shape (angled ceilings, alcoves, or multiple levels), that’s actually an advantage for breaking up acoustic problems.
Next, assess what’s currently absorbing or reflecting sound. Carpeted rooms stay quieter: tile or hardwood reflects sound and makes dialogue harder to follow. Heavy curtains, upholstered furniture, and insulation in walls all help control reflections. Bare walls and glass create echo. You don’t need to tear out all your hard surfaces, but be honest about what you’re working with. If you’re adding acoustic panels or bass traps later, knowing your starting point helps you target the right locations and quantities.
Seating distance is a practical constraint. Your TV size should roughly match viewing distance: sit roughly 1.5 to 2.5 times the diagonal screen size away. A 65-inch TV works well at 8–10 feet: a 75-inch needs 10–12 feet minimum. Closer seating strains eyes: farther away and detail suffers. Mark your ideal seating area on the floor, that’s where your viewing angle and acoustics will be most important.
Choosing the Right Equipment for Your Budget
Equipment budgets vary wildly: $1,000 entry systems versus $50,000+ reference-quality setups. Decide your overall budget first, then allocate it across display, audio, and seating.
Audio System Components and Specifications
Audio accounts for 50–70% of the home theater experience, yet many DIYers underfund it compared to the TV. A basic 5.1 system (five speakers plus a subwoofer) is the industry standard. That’s a center channel for dialogue and on-screen action, left and right mains, two surrounds, and a powered subwoofer. Atmos-enabled systems add height channels for overhead sound, but that’s a step-up option.
Center channel is the workhorse, it handles 60% of movie dialogue. Buy the best you can afford here. Pair it with matching left and right mains from the same manufacturer and series for tonal coherence. Surrounds can be smaller: their job is ambience and effects, not dialogue clarity. Budget-conscious shoppers often spend $300–600 total on surrounds and still get good results.
Subwoofer size and power matter. A 10-inch subwoofer handles most rooms under 3,000 cubic feet: larger spaces or bass-heavy movie fans benefit from 12-inch or 15-inch models. Don’t confuse wattage with impact, a 300-watt sub with good amp design and cabinet tuning outperforms a 1,000-watt poorly designed unit. Placement is critical: subs work best away from the center of the room and not in corners (unless your room is large and treatments are in place). Expect to move it around and listen from your seating position before finalizing placement.
Receivers (AV amplifiers) decode surround sound formats and amplify signals. For 5.1 systems, a 100-watt-per-channel receiver is typical. Ensure it supports the formats you care about: Dolby Atmos, DTS:X, or Dolby Vision for streaming content. Many Dallas homeowners stream more than they watch physical media, so check if your receiver handles your streaming box’s audio output without issues.
Wiring and cables: Use proper 14-gauge or 12-gauge speaker wire for runs over 50 feet: shorter runs tolerate 16-gauge. HDMI 2.1 cables support 4K and higher frame rates. Cheap cables cause intermittent dropouts and sync issues. Invest in quality here, a $15 HDMI cable works as well as a $100 one, but a $2 generic speaker wire from a big-box store courts trouble.
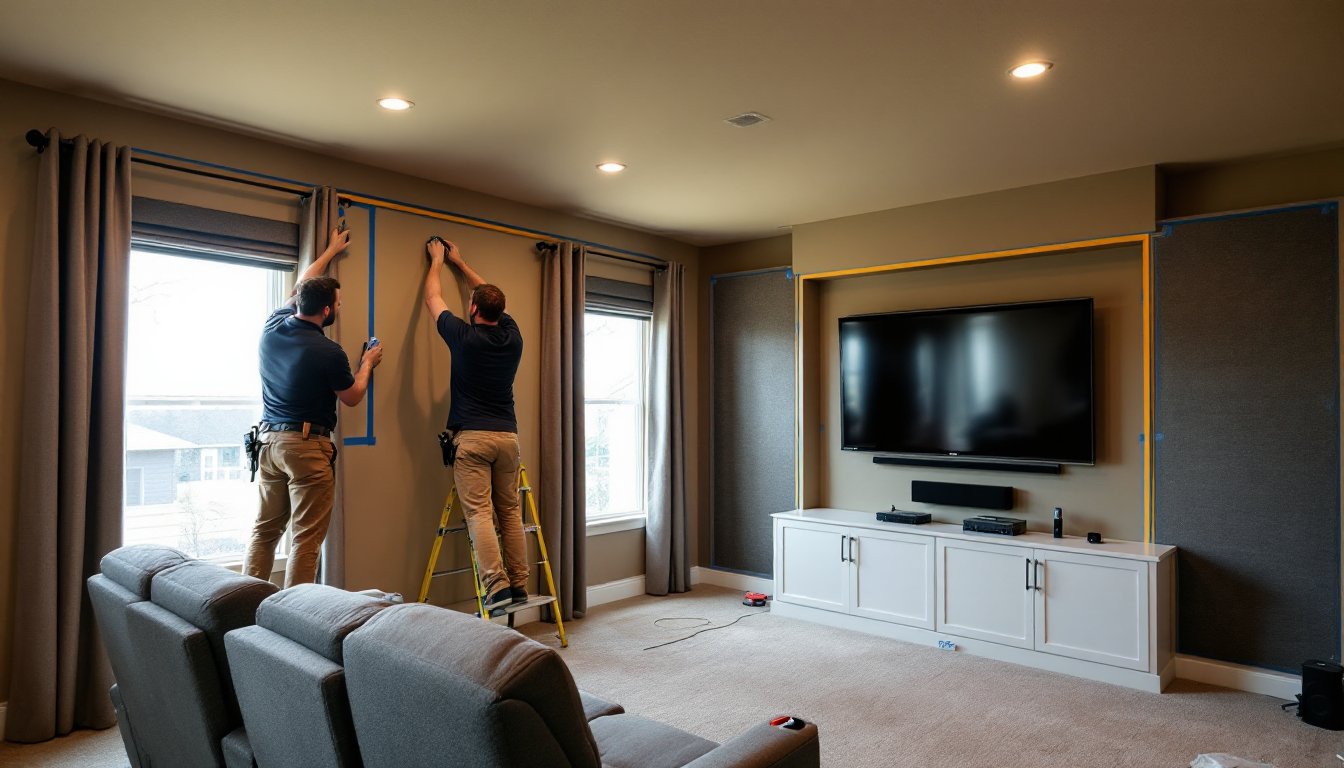
DIY vs. Professional Installation: What Dallas Homeowners Should Know
Honest assessment: some tasks are DIY-friendly: others aren’t. Mounting a TV and running speaker wire behind drywall are manageable for handy homeowners. Running electrical circuits, hiding wires in walls, or soundproofing requires permits or licensed electricians in Dallas. Know the difference before you start.
DIY installation makes sense if you’re comfortable with basic carpentry, drilling, and running wires through existing walls or conduit. Most homeowners successfully wire a 5.1 system if they take time to plan routes, use wire management (conduit, raceways, or in-wall-rated cables), and test before hiding wires. Mistakes here mean drywall cuts or re-runs, so prep work is non-negotiable.
Hiring a professional contractor is worth considering if you need structural changes, electrical upgrades, or aesthetic finishes (built-in cabinets, acoustic panels, tier seating). Dallas has qualified installers, though pricing varies. Resources like HomeAdvisor and Angi’s list of Dallas home theater professionals let you compare quotes and see customer reviews. Expect to pay $1,500–$5,000 in labor for a mid-range 5.1 system, more if custom cabinetry or extensive wiring is involved.
The hybrid approach works well: buy equipment yourself (saving 20–30% vs. bundled packages), then hire a pro for wiring, calibration, and any structural work. This balances cost and quality, you control equipment selection and spending, while professionals handle the technical setup and permits. ImproveNet is another resource for finding vetted contractors and getting cost estimates specific to your project scope.
Wiring, Calibration, and Finishing Touches
Wiring is where most DIY projects fail, not because of complexity, but because sloppy routing makes troubleshooting and future upgrades a nightmare.
Plan your wire runs before drilling. Use painter’s tape on the floor and walls to trace pathways from your equipment rack to speakers. Avoid running speaker wires parallel to power cables for more than a few feet, they can introduce hum or interference. If running wires in walls, use in-wall-rated speaker cable (CL2 or CL3 rating) and conduit where possible. Pre-drilling and fishing cables through existing walls beats tearing drywall. Label every wire at both ends with painter’s tape and a marker, it saves headaches later.
Calibrration after installation separates amateur systems from polished ones. Use an SPL meter (sound pressure level: often under $30) to check each speaker’s volume at your seating position. Aim for 75 dB on the meter when playing a reference tone from your receiver. Most modern receivers include built-in calibration microphones, but manual checks catch issues auto-calibration misses. Run test tones, listen for timbre matching (do dialogue speakers sound the same tonally?), and adjust phase relationships between subs and mains if needed.
Finishing touches include blackout treatments, cable hiding, and seating comfort. Blackout curtains or cellular shades reduce ambient light, crucial for contrast and color accuracy. Fabric-wrapped acoustic panels behind surrounds and above seating tame reflections without a studio look. Choose colors and designs that blend with your décor: they’re now available in dozens of finishes. Seating should recline and isolate vibration from nearby walls, a $400–800 piece beats a leftover living room couch. Finally, a power conditioner with surge protection for your electronics is cheap insurance against Dallas summer power fluctuations and lightning strikes. Plug in your receiver, TV, and streaming box to protect against voltage spikes.
Conclusion
Building a home theater in Dallas is achievable for most homeowners with realistic budgets and clear priorities. Start by understanding your room, allocate funds toward audio quality (it’s often overlooked), and be honest about your DIY limits versus when professional help makes sense. Wiring and calibration are the final steps that separate a great system from a frustrating one. Take your time, label everything, and test before hiding cables. A thoughtfully planned home theater pays dividends in daily viewing pleasure and resale appeal.